What is Saifa AI? A Complete Step-by-Step Guide for Beginners

Today many small and medium sized businesses are using AI in their operations to control sales, respond to chat and arrange internal data. This helps to speed up workflows and greatly reduce the effort for teams. Saifa AI is a platform meant to make adopting AI quite simple for businesses.
In this article, we’ll walk you through the basics of getting started with Saifa AI from joining up and setting up your system to launching your automated AI customer service. The method is simple and may be done by a solopreneur without any problem.
What is Saifa AI?
Saifa AI is an AI platform to enable SMEs to work smarter and care better for their customers. It brings two big features: Customer Service AI for seamless conversation automation and Company AI to assist you manage your team’s internal data and everyday tasks.
What’s even better, is the speed at which Saifa AI learns about your business. Simply upload your files or connect your website and the AI will answer questions based on your real data. And its Multi-Agent AI system works with different AI agents to find, analyse and summarise information, providing top-tier accuracy and decreasing mistakes.
Main Features of Saifa AI
- AI Smart Chat : Automated customer support in real time.
- All-in-One Inbox: One spot for multi-channel messaging.
- Easy AI Training: Upload files to train your AI.
- Data Insights: Deep analysis of customer interactions.
- Sales & Inventory: Easy to track orders and products.
- Smart Search: Quickly find internal info.
- Collaborate Seamlessly: Enable your team to work together more efficiently.
What type of business fit for Saifa AI?
- SMEs and online seller
- Customer Service teams
- Organizations with many of internal data
- Businesses that want to increase productivity with AI
Saifa AI supports integrations with multiple channels, including Facebook, Instagram, LINE, and various marketplaces, allowing businesses to manage all customer support from a single platform. A free trial package is available to help you get started.
How to Get Started with Saifa AI in 10 Easy Steps
Step 1: Sign Up for Saifa AI
Getting started with Saifa AI is quick and easy. You can register using Google, Facebook, or your email. The platform offers a Free Trial with no credit card required, allowing you to explore its capabilities completely risk-free.

How to Sign Up:
- Visit the Website: Go to Saifa AI and click the “Join Saifa” button.
- Choose a Sign-Up Method: Select either Google, Facebook, or your preferred email address.
- Fill Account Details: Fill in the following required information:
- Username & Phone Number
- Password: Must be 8–32 characters long, containing at least one uppercase letter, one lowercase letter, one number, and one special character.
- Company Name
- Workspace Name
- Select Business Size: Choose your employee count or company scale.
- Pick a Plan or Select the Free Package to start using the platform instantly.
After completing the sign-up process, the system will guide you to fill in your company information and set up your internal Workspace. For SMEs looking to explore Saifa AI, the Free Package is the perfect place to start. It includes everything you need to test the system:
- 1 User Access
- 10 GB of data storage
- 1 Connected Sales Channel (Choose any platform)
- 100,000 AI Tokens per month
Try Saifa AI for Free: https://app.saifa.ai/signin
Step 2: Create Your Workspace and Business Information
Upon your first login, Saifa AI will prompt you to set up your business Workspace by providing the following details:

- Workspace Name
- Currency
- Time Zone
- Language
- Workspace Description: Briefly describe your business to help the AI better understand your industry context.
Completing this step helps the AI grasp a comprehensive overview of your business, leading to more accurate responses and precise data analysis.
💡 Tip: You can immediately upload your Data Sources to train your AI. The system supports various formats including Excel, PDF, Word, CSV, PowerPoint, website links, and raw text manuals. Other onboarding steps like “Add Product” or “Invite Your Team” can be skipped for now and managed later within the main dashboard.
✅ See more subscription plan here: https://app.saifa.ai/settings/subscription-plan
Step 3: Upload your data source to train your AI
In this step, you will use Saifa AI’s Data Source menu to manage your business knowledge base. You can fully control which files the AI uses to reply to customers and which files remain strictly for internal use. Saifa AI will only retrieve and answer questions based on the specific data you authorize.

Uploading Your Data:
- Go to Resource Menu -> Select “Data Source” to submit your business files. The system allows many formats such as files, websites or raw text (maximum 5 files can be added at a time).
- Choose Data Type: Choose the category that best describes your dataset (choose 1 category per upload):
- Organizational Data: For internal operations and knowledge of the company.
- Product & Market Data: Product details, specs and market information.
- Customer & Industry Data : For customer insight and industry understanding.
- Human Resources Data: for employee policies and HR data.
- Data Source Name: Type in a “Data Source Name” (optional).
- Sync Products: You can select to sync the relevant product data (This option is available once you have finished uploading your product information).
- AI Settings: Specify which AI agents are allowed to view this file.
⏳ Note: Once the system has successfully uploaded and processed your information, the file status will change from Pending to Complete.
Step 4: Product & Store Setup (Commerce)
Then add your products (Add Product) so that the AI gets a better knowledge of what your business sells. Saifa AI has an e-commerce dashboard (like Shopee/Lazada) to manage inventory, payments and shipping. You may manage product photos, descriptions, pricing, stock levels, SKUs, weight and dimensions, all in one place. You can also add your payment methods and delivery setting on the platform.

How to Set Up Your Shop:
- Access the Menu: Go to Commerce -> select Product -> click Add New Product. You can add products manually or import your product data by using an Excel file (a template.csv is provided for use).
- Enter Product Details: Upload your product images, then fill in the product name, description, category, price, stock quantity, SKU, weight, and package dimensions.
- Set Up Payment Methods: Go to Payment to configure your options, such as Cash on Delivery (COD), Bank Transfer, or PromptPay QR Code.
- Set Up Shipping: Go to the Delivery Setting menu to specify your shipping methods, delivery fees, and any other logistics-related information.
Step 5: Connect Your Channels via Integration Settings
To centralize your customer messages from Facebook, Instagram, LINE, and various sales platforms into a single inbox, you can connect directly from the Integration menu.

How to Integrate Your Channels:
- Access the Menu: Go to Settings -> select Integration Settings.
- Choose a Channel: Select the platform to connect (e.g., Facebook Page, Instagram, LINE OA, or Lazada).
- Authorize the Connection: Click the Connect button. The system will redirect you to log into platform’s account that you selected.
- For Facebook & Instagram: You must use an account that holds Admin permissions for the page.
- For Instagram: Ensure your account is set to an Instagram Business Account and is already linked to your Facebook Page.
- Confirm Permissions: Select the specific page or account you need to integrate, then grant and confirm access permissions.
📥 Result: Once successfully connected, Saifa AI will instantly sync and pull all incoming chats directly into your central Inbox dashboard.
Step 6: Setup Your AI Chatbot
Once your chat channels are connected, you can set up your AI to automatically manage customer chats. One of the highlights of Saifa AI is the level of customization that provides. User can totally tailor the personality, tone of voice, name, answer style and formatting of your AI so that it feels just like a human admin.
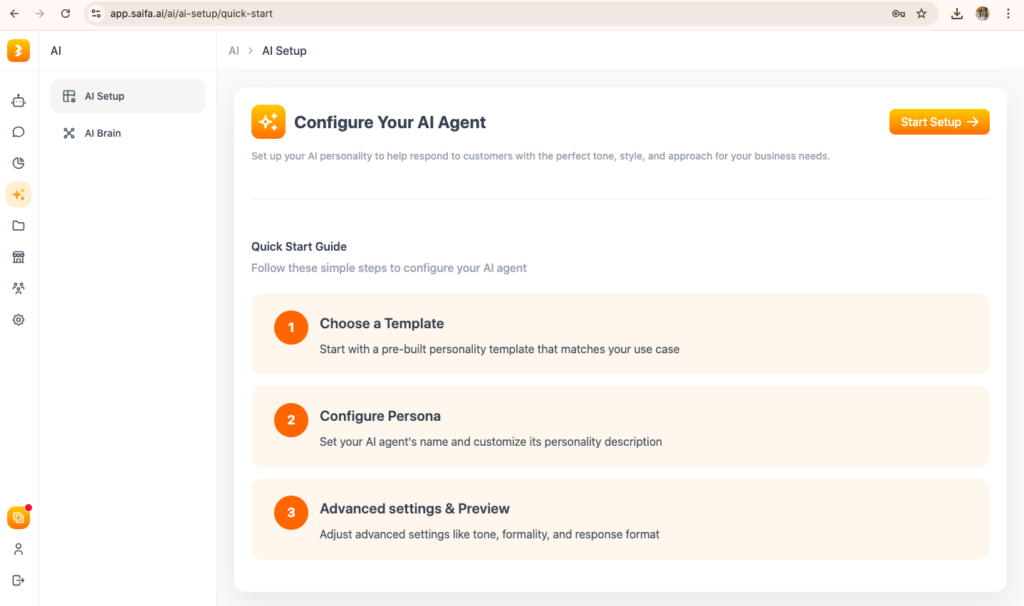
Steps to Get Your AI Chatbot Running:
- Go to AI > AI Setup > Start Setup.
- Pick a Template: Select an AI base template that fits your workflow.
- Build a Persona: Give your AI a Name, Personality, and Gender.
- Customize Tone and Personality: Set your preferences for formal/casual style, emoji usage, language type, and response length.
- Enable Natural Messaging (Split Long Response): Enable Split Long Response to deliver answers in separate chat bubbles.
- Then Click Save to activate your customized AI chatbot.
Step 7: Activate "Assign to AI" Mode
Once your channels are connected and your AI is fully configured, you can activate the “Assign to AI” mode. This allows the AI to immediately take over customer conversations, reducing your admin team’s workload and speeding up response times. You can turn this on directly from the Inbox to let the AI chat with customers and close sales automatically.

How to Enable “Assign to AI”:
- Open Dashboard: Go to the Inbox menu.
- Select Target: Pick the customer conversation or chat channel.
- Trigger AI: Open the AI menu.
- Turn On: Switch on “Assign to AI” to let the AI chatbot instantly take over the conversation.
Human Takeover: Human admins can jump in and reclaim the chat from the AI at any moment for seamless hybrid support.
Step 8: Go thru Chat Analytics System
Saifa AI does not only provide automatic replies, it provides a Conversational Analytics solution. This feature helps businesses to get a deeper understanding of their customers at every level of the funnel, from the first stage to the final purchase decision.

This AI analyses customer sentiment, probability of closing a sale and offers the best way to respond; enabling your sales and admin teams to work more efficiently.
How to Access Conversational Analytics
- Go to Inbox > Select Customer Profile > Click “Conversational Analytics”.
- Data Insights: View real-time tracking of Sales Closing Opportunities and Customer Sentiment (mood analysis).
- Actionable Strategy: Leverage AI Recommendations to get instant, data-driven action plans tailored to close each specific sale.
Key Feature: The Conversational Analytics interface features AI Recommendations that provide specific next steps and personalised action plans to support your team in closing the transaction successfully.

Step 9: In-Chat Order Creation
Saifa AI has an inbuilt Create Order system that allows admins to create orders directly from the Inbox interface. It makes tracking order status easy and shortens order processing.
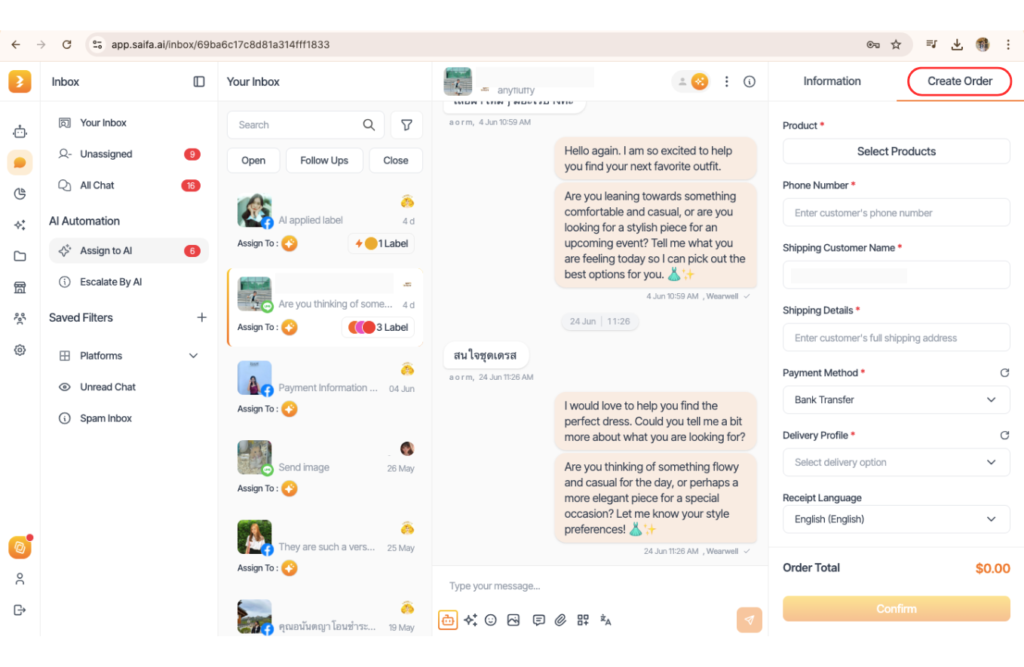
How to Place an Order:
- Inbox > Choose Customer > Press “Create Order” (right panel).
- Select Products: Click “Select Product” and add the items.
- Shipping details: Fill the customer information (name, phone number and delivery address).
- Set Fulfilment: Choose payment and shipping methods.
- Confirm Double check the details and click “Confirm” to create an order.
Once create, all order information are automatically saved in the Order tab (under the Commerce menu). You will be able to simply track payment statuses and shipping fulfilment later on.
Step 10: Utilizing "Company AI" in Saifa AI
Company AI is a key component of Saifa AI that acts as your internal AI Assistant like ChatGPT but tailored to your corporate environment. Company AI allows your team to effortlessly search, analyse and summarise internal organisational knowledge using the data you supplied earlier to the Data Source menu. Your team can see the information directly on the main dashboard and start chatting with the AI instantly.
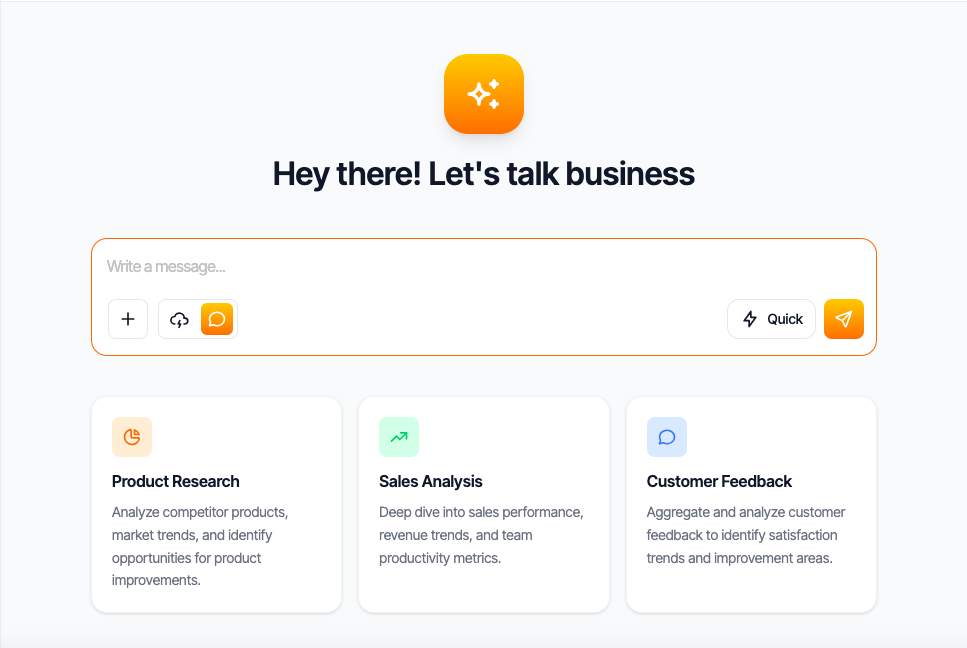
What Company AI Can Do For Your Team:
- Find & Search: Search and find product specs and internal company data.
- Summarize: Sum up company documents and customer insights.
- Analyse: Review sales metrics, product portfolios, and competition data.
Key Highlight: Company AI will refer to uploaded files to analyze data and provide very accurate response. This greatly reduces the time needed to find documents and increases overall team productivity. Unlike one-size-fits-all AI models, Company AI is trained on your real business data, so it knows your business context. This makes every reply highly relevant, actionable and fit to your business.
Don’t Forget to Test-Drive Your AI!
Don’t skip the test drive! After setting up every step is completed. Make sure your AI is fully trained and aligned with your business context before customers see it. Send a few trial messages through Facebook or LINE to see it in action.
Recommended Testing Scenarios:
1.Inquiring about specific product information.
- Review shipping costs and delivery times.
- Ask about current promotions.
- Simulating the creation of a product order.
Testing these several scenarios will give you an idea of how well the AI is able to pull information from your Data Source. If you find that some of the responses are not complete you may change your documents, add new FAQs, or change up the AI’s character any time. Advance testing allows for a successful launch and a great first impression for your customers.
👉🏻 Sign up for free!: https://app.saifa.ai/signin
👉🏻 Watch the full Saifa AI video tutorial here: https://www.youtube.com/watch?v=s5b6ocNHYnE